Monday 1 February 2010

Demolition Man

This is the Utility Room. Essentially it is a wooden shed bolted onto a corner on the back of the house with two sides (the other two being the house) and a rusty corrugated iron roof. The surveyor described it as a shanty-like-structure. I think he was being polite. The wood was rotting and there were holes pathed with more rotting wood. The ceiling sloped down away from the main house but, at six foot tall, I found that it was too low almost as soon as I entered the room. However, in order to make the scaffolding more simple to erect we decided to pull it down. Strictly speaking we needed Listed Building Consent (LBC) first but I spoke to the council and they explained that there 'probably' wouldn't be a problem to remove it and accepted it was necessary if we were to repair the roof before the worst of the weather.

In addition to the utility room, there was a conservatory and lavatory against the back of the building too. These too needed to be demolished for the sake of the scafolding. Conservatory is a generous description too. A plastic corrugated roof, breeze block walls to waist height and windows. There wasn't enough space to put a chair, not that you'd want to as the whole room was mouldy too.

All of these structures came down in a weekend with the help of my Brother, Mother, Jess and Lynn (Jess' Mum). Everything was taken to the recycling centre or buried in the holes that were the ponds and the belfast sink, which was in the conservatory, carefully put away to be used somewhere else in the house in due course.


Even if we wanted to keep it we would have to have pulled it down in order to re-build it.
Wednesday 20 January 2010

I Dig Digging!


Once the ponds were clear we decided to start fixing some of the damp on the house. At the back of the house, where the filtration tanks were, the ground was almost 2ft higher than the floors inside. This has allowed damp to penetrate the walls for over a century. To cure this there are a few options but the obvious way is to lower the ground outside the house below the floors inside the house. Here I should point out that most people would hire a digger to help with this but as we are trying to save as much money as possible Idecided to dig by hand. I dug a trench by the house about 5ft wide almost 2ft deep and in all about 20ft long. There isn't much to say about this except that it was hard and took about 4 days!

Lynn, Jess' mum, deserves a mention. To date she has helped most weekends at the cottage and is not afraid to tackle some of the more difficult tasks either. One of which was the bamboo roots. The bamboo mentioned in a previous post had really estabilished itself along the side of a concrete path. The roots were a mass of matted bamboo extending about a foot into the ground and a foot thick. To give an indication of how hard this was to excavate we attacked it with a pick axe, a crow bar, an axe, a saw and a shovel for about 10 minutes to release a fist sized clump of roots. Needless to say I left Lynn to cope with most of it on her own and she did a sterling job of digging it all out, although I must admit I thought that might be the last time she offered to help.
We then started to get some rain and the trench that I had dug began to turn into a quagmire so we dug a small trench on the side away from the house and ensured it ran down hill and then I dug an additional trench towards one of the ponds, which by now is full of broken concrete and used it as a soak away.

By now we we had done most of the jobs outside that we wanted to do (although the aborist still has to cut down some trees) and started to concentrate on the house itself, in particular, enabling the scaffolding to be put up.

The Ponds!

When the cottage was used as a nursery it specialised in Japenese plants, particularly bonsai trees, and also had a substantial koi carp breeding programme going on. To keep the koi there were four rather large ponds that Jess and I intend to drain as ponds not conducive to dogs and we have no intention maintain ponds in the future. The biggest pond (pictured) is about 10ft wide by 15ft long and 3-4ft deep. Two of the others are about 8ft wide by 10ft long and almost 6ft deep and the fourth pond is basically a series of 3 interconnected pools about 4-6ft in diameter.

We didn't really know where to start (again) but fortunately one of our new neighbours came over to see us on our first day as home/wreck owners and offered the use of his pump, which was great as we thought we would need to buy one. The pump managed to drain the water within each pond in a matter of hours while in the meantime we could start lifting paving slabs surrounding the ponds and continue to dig out some more filtration tanks. We also had to rescue no end of frogs, small fish and also two large koi and a ghost carp that had been fending for themselves for the last couple of years. We transferred all the fish from one pond to another and manged to sell the koi to our arborist. Once we started to drain the last pond we collected all the fish and put them in the village pond. Unfortunately I was caught doing this by the recently retired parish counciller but he saw the funny side and hoped the local herons would be pleased.

Once the ponds were empty we had the linings to contend with. These were cemented in and extremely heavy, not least because of the amount of gunk and gravel collecting in the bottom. We thought that the linings might come in useful to go underneath a new driveway, patio or path so we were keen to keep them in good order. In all it took us a couple of weekends to clear the ponds and now we have these great holes in the ground we can fill them with the concrete paths from around the garden and save ourselves the cost of 4 or 5 skips.

Friday 8 January 2010

The project...


This is what we have bought. As you can see, the cottage is dwarfed somewhat by the conifers surrounding it. The left hand part of the cottage that you can see behind the trees is the north end, which is the oldest part of the building. The thatch has been damaged beyond repair and some of the roof timbers have gone too. The evergreens keep the house in perpetual shade so the house has become increasingly damp, although it was lived in two years ago and I have high hopes that the damp can be easily remedied, in part by removing the trees and letting the sunlight dry out the cottage a little.


This is the view from the rear of the property. The conifers here are simply massive, in fact so big that if they were blown over in a storm they would smash the house. You can also see the north end of the property again: note the lean on the chimney. This isn't caused by the refraction of the lens on the camera, it really does lean that much towards the house. I am not overly concerned as the surveyor, Rober White, has said that it is relatively stable but I will need to knock it down and re-build it if we want to use the fireplace, which we do.


On our first day as home/wreck owners we packed the van to the brim with tools and made the short journey from Larkhill to Burbage. Despite having a plan, we didn't really know where to start with the cottage? However, we made a concious decision not to start doing anything on the inside as the roof leaked and we thought that any effort inside might be wasted and also thought it might be useful to create some space in the garden.
We wanted to get it re-thatched first but had to wait until the thatcher, Alan Coles, could start, who in turn needed Listed Building Consent (LBC), which will take a couple of months. We also need to put up scaffolding for the thatcher, the scaffolder, David Lidiard of ONC, needs the conservatory and utility room demolishing, which also requires LBC. The scaffolder and thatcher also need the trees closest to the house felling, which requires approval from the conservation department within the council. The aborist, Dan Last, needs the electricity supply cut off as the connection to the house ran through the trees. Once the trees are down, demolision complete, elecricity cut off, the scaffold up, the thatch removed, the roof repaired and felted, chimneys pointed, knocked down, built-up and lined then, and only then... the re-thatching can begin!
So, wandering around the garden with a small axe in one hand and lump hammer in the other, I started looking for a job. By the utility room (which the surveyor described as a shanty-like-structure) was a wooden lean-to nailed into the wall of the house. Underneath the lean-to was a working area that the previous owner once stood at creating bonzai trees. Underneath the work surface were filtration tanks. Adjascent to the lean-to was a wooden box construction containing more filtration tanks for the four ponds. A swift smack with the lump hammer and some of this wooden box fell off. A few more smacks and it was soon a rotten pile of timber on the floor, I then set to on the lean-to but upgraded my lump hammer to the sledge hammer, assisted by a crow bar. Jess kindly ferried the timber to the road side where we later took it to the recycling centre.

The ground underneath the lean-to is over a 30cm higher than the floors on the inside of the house, which has caused a degree of penetrating damp over the years. It will need digging out, but before I can, I need to remove the filtration tanks and all the associated plumbing. The garden is riddled with pipes and filtration tanks and I have no idea where any of the stop-cocks are? In addition there are a number of electrical pumps, which are causing not just a little concern! Anyway, I took the plunge and started to saw through the connecting pipes and one by one removed the filtration tanks. They were all far to heavy to shift intially, as once they had been drained they were still half full of gravel and silt. We kept the gravel to use for garden paths later and used the ten-or-so tanks as bins, which we filled with rubbish and took to the recycling centre.
Following this job, Jess and I made a start on the bamboo. In all there was about 12-15 metres of 'bamboo hedge' which was about a 30-50 cm thick in places. We cut it all down and began to pile it up. We have great ideas about re-using as much of the materials as possible and thought the bamboo would make useful canes for the vegetable patch but once the pile of bamboo was two metres high we just wanted rid of it so plan to ask Dan if he'll chip it and take it away for us.
Next up, the ponds!

For starters...

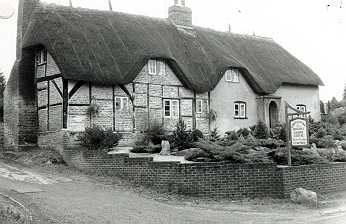
This blog is about the old nursery known as Conifer Cottage in Burbage, Wiltshire. It is a Grade II listed building set within a conservation area. As far as we can tell, the cottage dates back to the late 16th Century and has been added to a number of times. The original building is timber framed with wattle and daube noggins although most of the noggins have been replaced with brick. The original cottage ran north/south and was a two up, two down affair with a thatched roof with fireplaces at each end. The cottage has been extended south, firstly by one room upstairs and two downstairs with an additional fireplace and chimney built against the back of the existing southerly flue. The second southerly extension saw another room upstairs and downstairs with another fireplace and chimney to the east. Both extensions were of brick and the exterior walls have been rendered with concrete all the way around. On the east side of the cottage a bathroom, utility room and conservatory have also been added.

The grounds of the garden are full of conifers, bamboo and ponds, all of which have not been tended to in years and have left the garden almost impenetrable.

Jess and I bought the property in October 2009. It is our first house. It needs a new thatch, new roof timbers, re-wiring, re-plastering, central heating, chimneys repairing, fireplaces opening, floors levelling, damp curing, render removing, render replacing, ponds filling, trees felling, garden landscaping, parking creating, utility and conservatory demolishing, new doors, new bathroom, new kitchen, and finally, a spot of decoration.

Work has begun, and I'll update you of our progress shortly.